Associative Video Memory - Yeremeyev method (abbreviation AVMY)
Principle
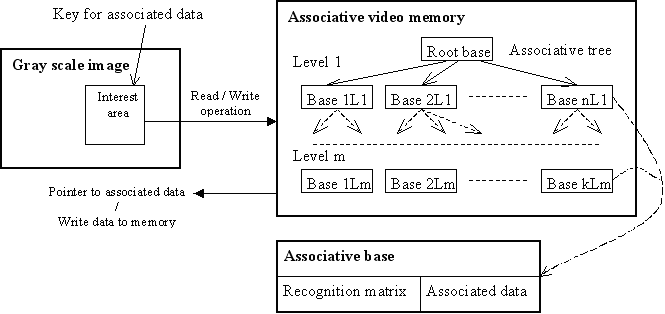
Associative video memory technology is based on multilevel decomposition of recognition matrices. The "AVM" consist of associative bases tree and use input image as a key for data access.
It means that each visual object correspond to a set of associative bases inside AVM tree. In contrast to Viola&Jones algorithm for AVM algorithm is not required negative images in learning process and it do learning process faster and easier. The principle of AVM can be used not only in computer vision. It may be propagated to any signal processing and it can work more efficiently than FFT + ANN classification because AVM use only integer (no float or double in processing) and it provide AVM more quick-action. The AVM also is simple method and can be implemented in hardware. [find out more]
Testing
First it is necessary to define base key image size for recognition when AVM initiate. Recognition capacity of AVM method is depended on key image size parameter (that also depended on sequence 40, 80, 160, 320, 640, 1280... 2^n*10) because it defines dimensionality of recognition matrices inside each level of associative bases (see detail in FAQ). The AVM method was tested on a selection of 4 objects from ALOI database on different key image size (see diagrams below).
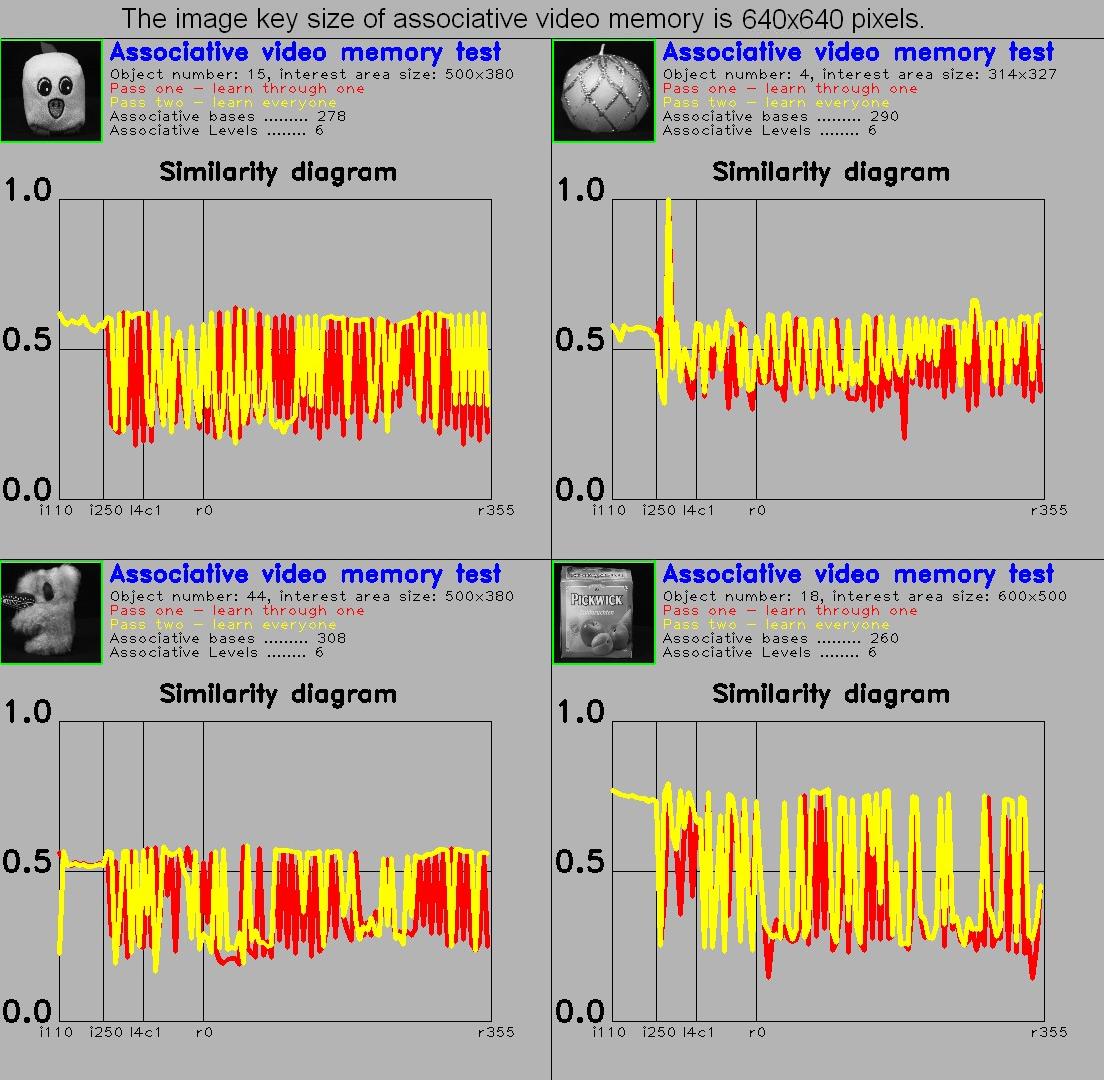 |
<- key size 640x640; |
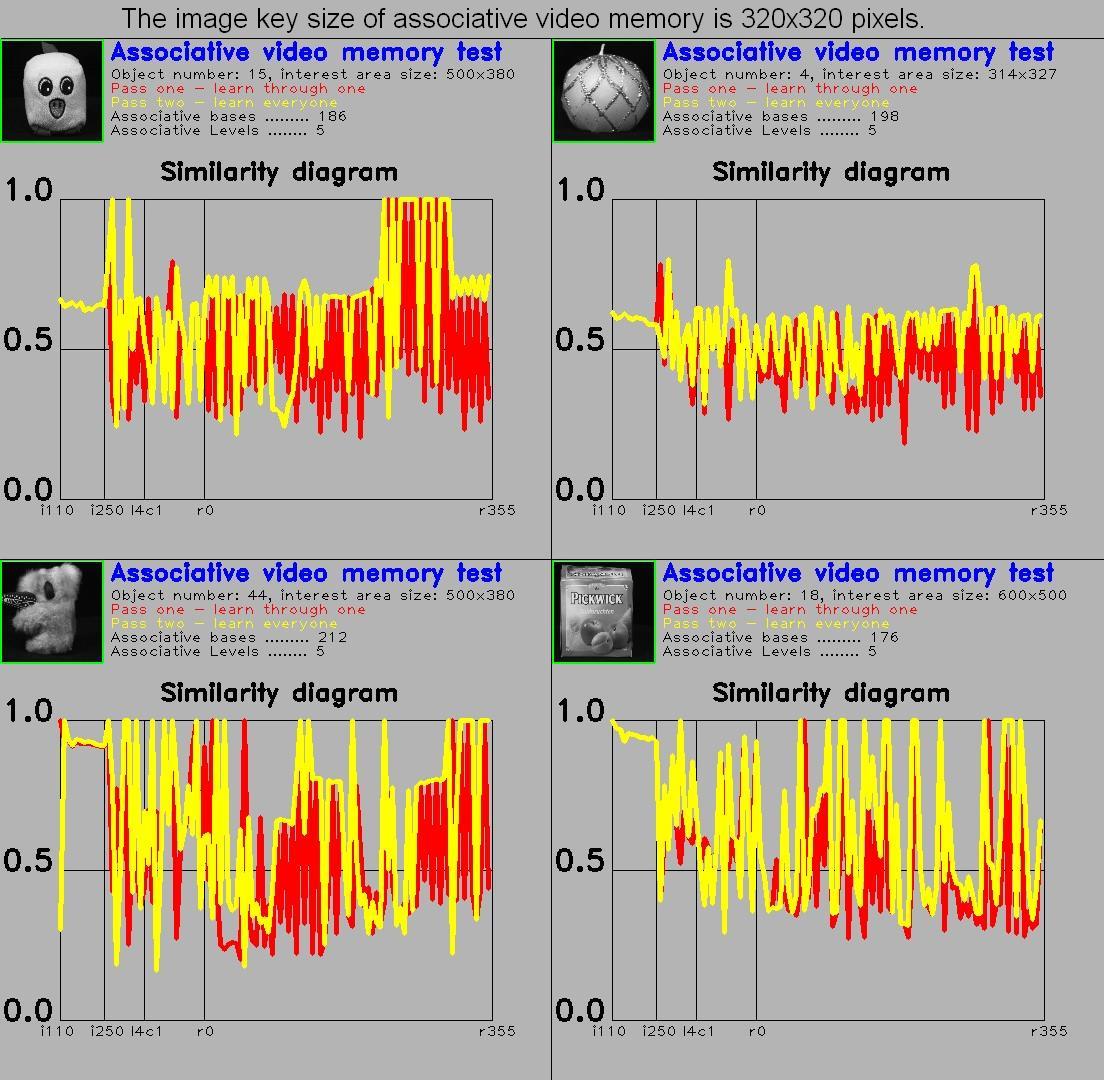 |
<- key size 320x320; |
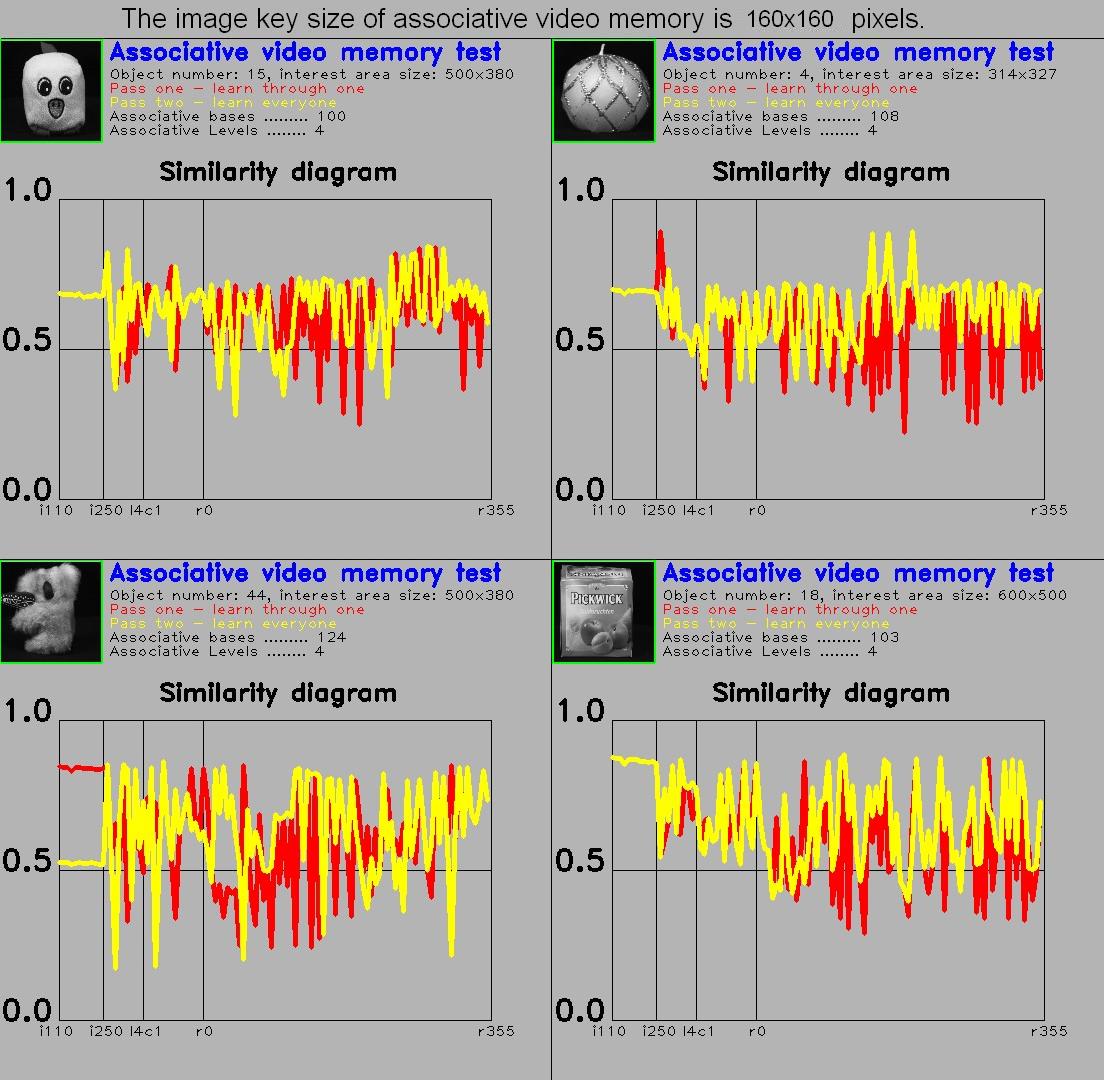 |
<- key size 160x160; |
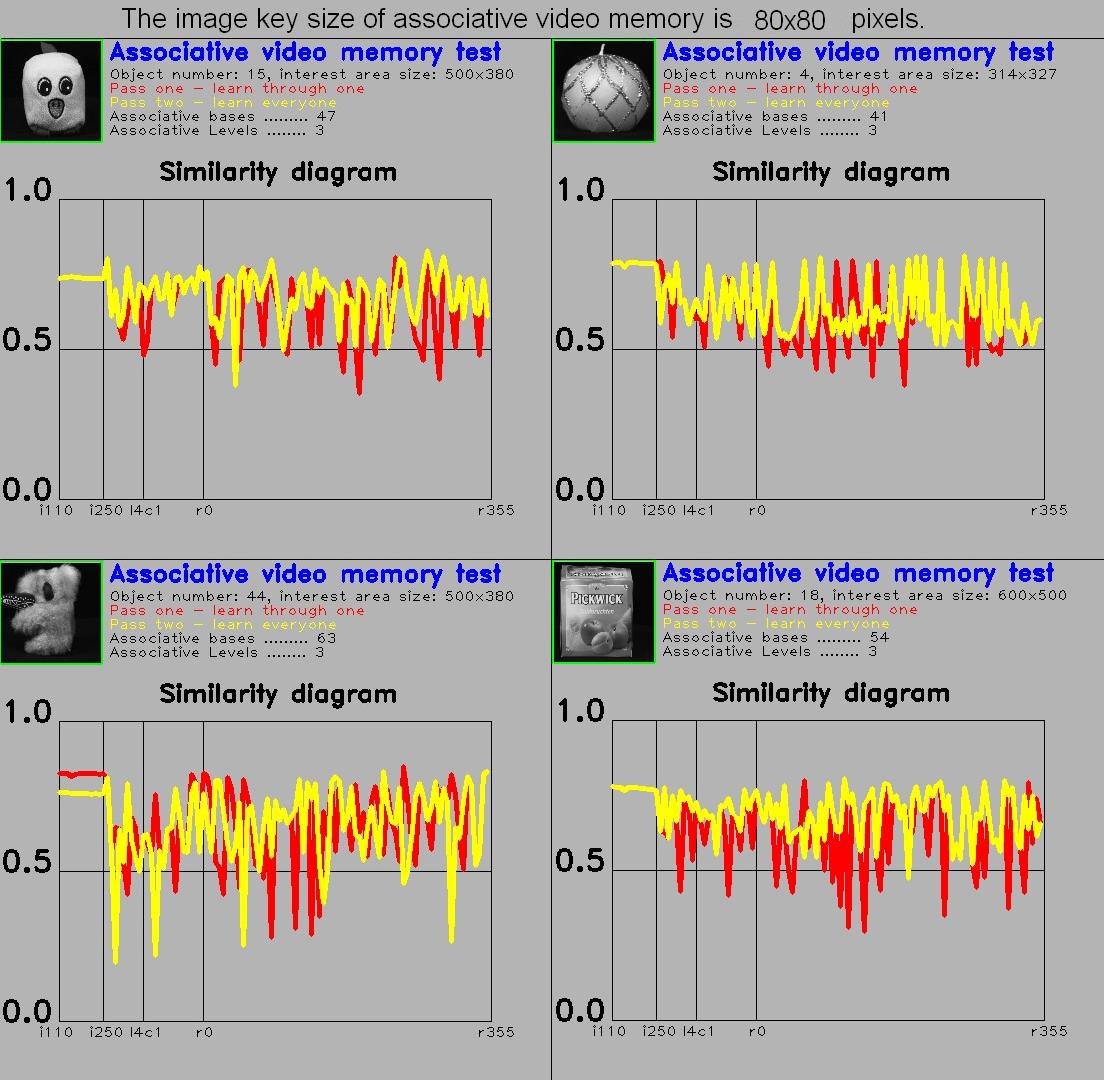 |
<- key size 80x80. |
Also one company made own independent testing (AVM version 0.2, see download page):
Hello
We tested your algorithm by different ways and conditions,
and provide you with the best results we manage to achieve. We test on a
selection of 32 object from ALOI database and best test results have been gotten
with the following conditions:
Minimum rectangle dimensions is
181 pixels for ‘Write’ method
Entire image is taken as interest
rectangle for the ‘Read’ method
Each different object is stored in
the separate associative network
We tested 2 key image sizes -
80, 160 pixels
We tested with 2 search steps, 15,
5 pixels
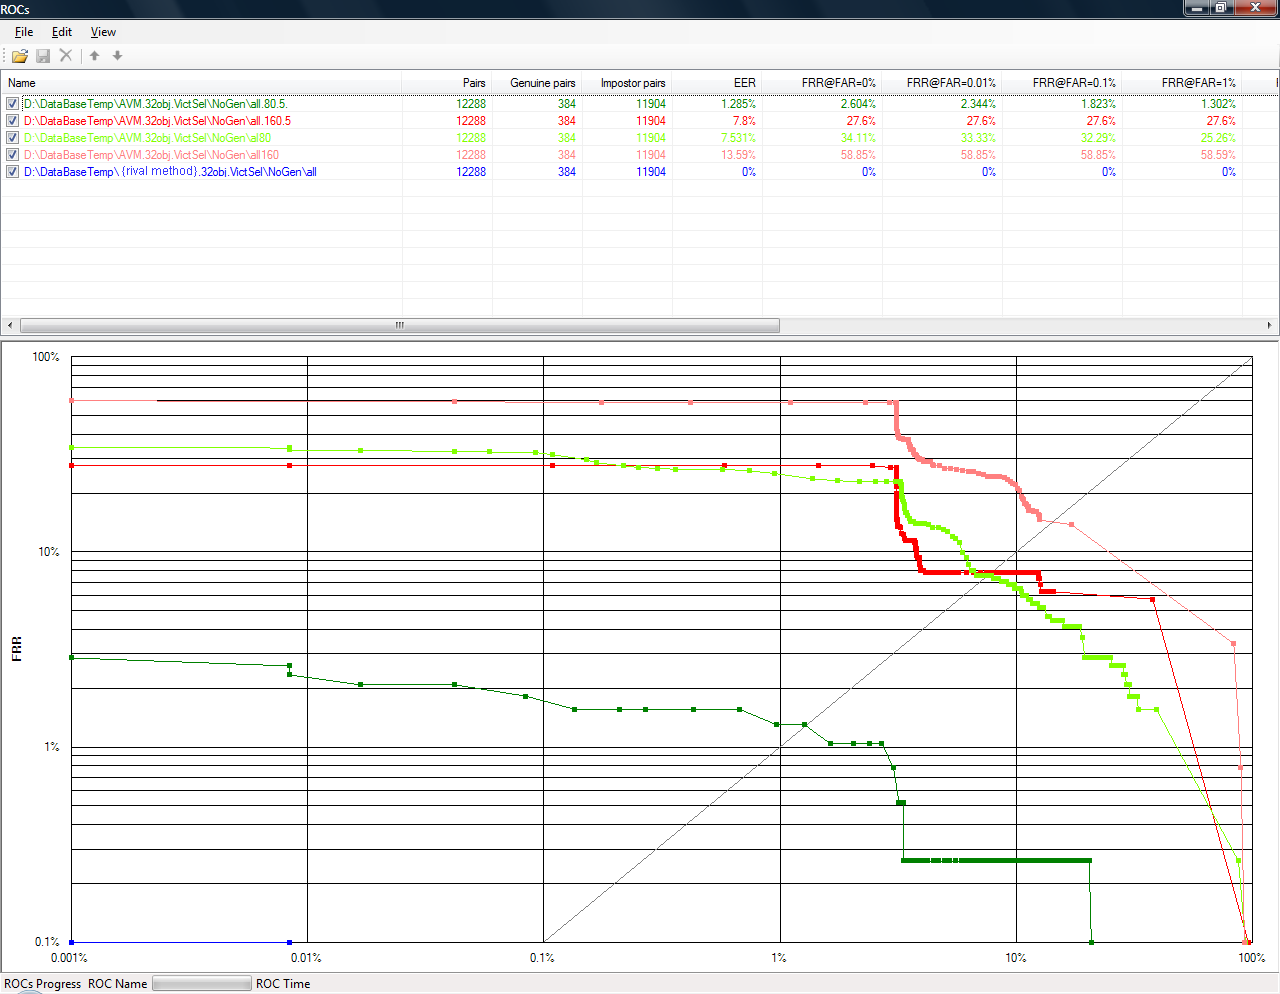
Some test details are in the table below and in
attached graph with rocs.
 |
<- test results |
|
times in
mls. |
Extraction |
|
Matching |
|
| |
|
|
min |
max |
average |
min |
max |
average |
|
{rival method} |
280.174 |
1648.029 |
533.0843 |
1.844 |
101.077 |
14.40634 |
|
AVM 80X80 ST
15 |
2.425 |
3.717 |
3.08875 |
7.402 |
169.343 |
20.02165 |
|
AVM 80X80 ST
5 |
2.425 |
3.717 |
3.08875 |
73.678 |
1272.533 |
208.5516 |
Our test shows what significantly better recognition
quality is for smaller (80 pixels) key image size and for smaller (5 pixels)
search step. However with smaller search step the algorithm becomes much slower.
As comparing with {rival method}, {rival method} has better
recognition quality, slower extraction and at least comparable matching
speed.
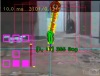
Quick-action
In version 0.4 the matrix search algorithm was improved and it give decrease of processing time on each frame to 10 ms (quick search) at Core 2 Duo E6600 on test sequence RcgTraining4s.avi (resolution 352x288).
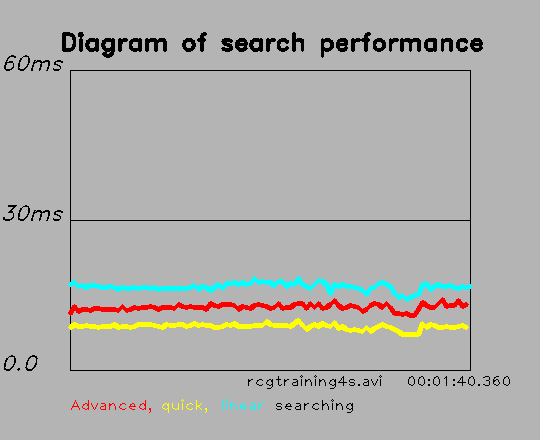 |
Performance test result |
AVM version 0.5
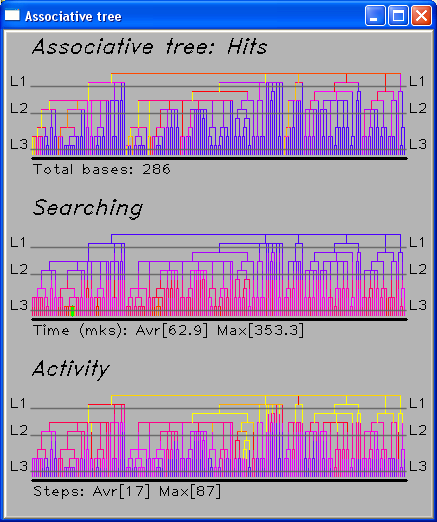 |
Real-time diagram of associative tree |
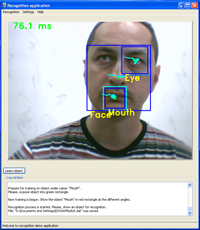
Face Recognition
Robot's navigation
I also want to introduce my first experience in robot's navigation powered by AVM.
|
Briefly, the navigation algorithm do attempts to align position of the tower and the body of robot on the center of the first recognized object in the list of tracking and if the object is far will come nearer and if it is too close it will be rolled away back. See video below: I have made changes in algorithm of the robot's control also I have used low resolution of entrance images 320x240 pixels. And it gave good result (see "Follow me"): Also I have successful experience in robot navigation by gate from point "A" to "B". First an user must set the visual beacons (gates) that will show direction where robot has to go. Robot will walk from gate to gate: First, the robot was set at checkpoint p[2] and then the robot received the command: "walking to the point p[1]". The robot has started looking around and when he has seen gates which correspond to the route [1] then began move to checkpoint p[1] by gates. In checkpoint p[1] robot has stopped. Then the robot was instructed to follow to checkpoint p[2] and robot again has started looking around and found the appropriate route gates and has come to checkpoint p[2]. I made Navigator plugin specially for using within RoboRealm software. So, you can try now to review my experiments with using AVM Navigator. |
|
The Navigator module has two base algorithms: Now AVM Navigator v0.7 is released and you can download it from RoboRealm website. In new version is added two modes: "Marker mode" and "Navigate by map".
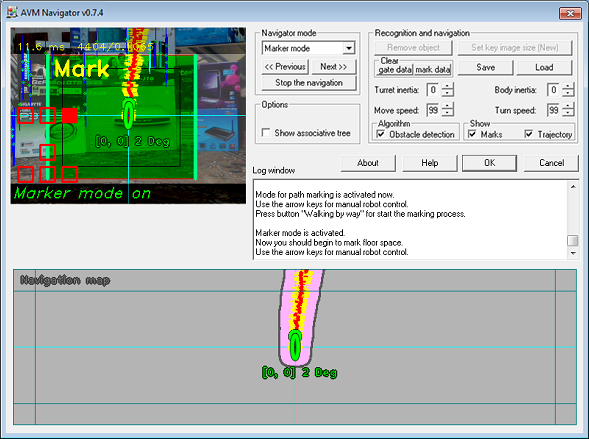
Marker mode
Marker mode provides a forming of navigation map that will be made automatically by space marking. You just should manually lead the robot along some path and repeat it several times for good map detailing.
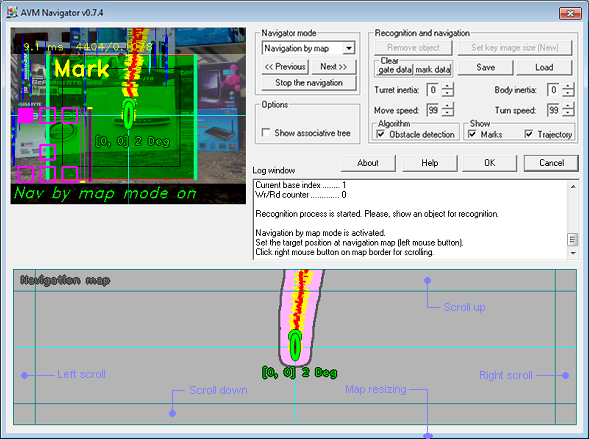
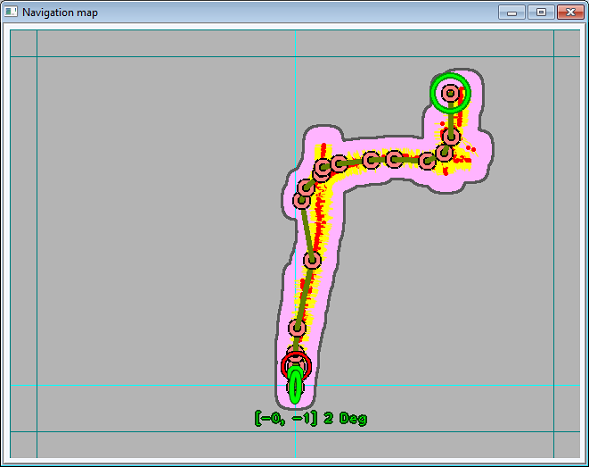
Navigation by map
In this mode you should point the target position at the navigation map and further the robot plans the path (maze solving) from current location to the target position (big green circle) and then robot begins automatically walking to the target position.
For external control of "Navigate by map" mode is added new module variables:
NV_LOCATION_X - current location X coordinate; NV_LOCATION_Y - current location Y coordinate; NV_LOCATION_ANGLE - horizontal angle of robot in current location (in radians);
Target position at the navigation map NV_IN_TRG_POS_X - target position X coordinate; NV_IN_TRG_POS_Y - target position Y coordinate;
NV_IN_SUBMIT_POS - submitting of target position (value should be set 0 -> 1 for action).
Examples
I prepared emulator program (based on Quake 3 mod) for acquaintance with "Marker mode" and "Navigation by map" modes. 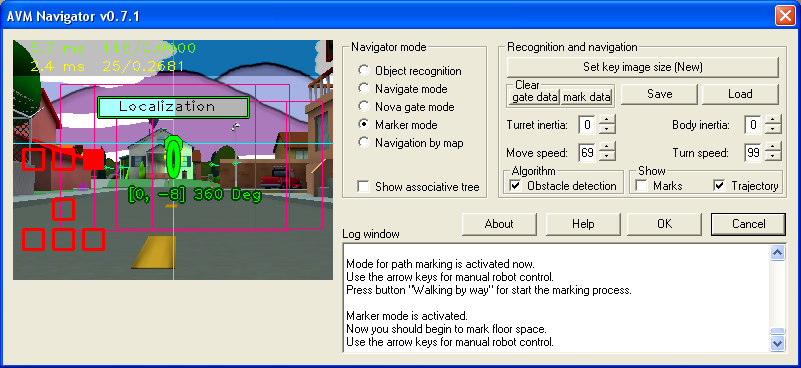
See "AVM Quake 3 mod" manual for more details. It is free and you can download installation of "AVM Quake 3 mod" by this link. Now, let's try to use this modes directly on real robot (step by step). 1. Connect your robot to AVM Navigator: Just use the variables that described below for connection of your robot to AVM Navigator: Use variable NV_TURRET_BALANCE for camera turning: NV_TURRET_BALANCE - indicates the turn degree amount. This value range from -100 to 100 with forward being zero. Use for motor control NV_L_MOTOR and NV_R_MOTOR variables that have range from -100 to 100 for motion control ("-100 " - full power backwards, "100" - full power forwards, "0" - motor off). If you use Lego NXT platform then you should just adjust variables NV_L_MOTOR and NV_R_MOTOR to the range of NXT parameters (motors range from 0 to 255 with 128 being neutral) by VBScript: http://www.roborealm.com/forum/index...hread_id=4086# 2. Call the dialog window of AVM Navigator (click on it at video processing pipeline) and then switch to "Nova gate mode". Now you can control your robot by arrow keys and also you can turn robot camera by "Delete" and "Page Down" keys ("End" key will set the camera in front position). 3. Move your robot to the start position. In this position will be placed origin of navigation map. 4. Reset markers data information by click at "Clear/mark data" (if it needed). 5. Switch to "Marker mode" and then you should manually lead the robot along a route. 6. In the end of route you should switch to "Nova gate mode" and then save route data (click "Save") to the file that will has different name with default "avm.dat". 7. Return to the start position and switch to "Navigation by map" mode then you should point robot to the target position at the navigation map (click the left mouse button on the map) and robot automatically will navigate to this point. You should repeat items 2-6 several times for good detailing of navigation map. For more information see also thread: "Using of AVM plugin in RoboRealm" at Trossen Robotics. Next modification of AVM Navigator v0.7.2.1 is released. Changes: Visual odometry algorithm was updated: Scorpio presented his great project of the robot "Vanessa" that also used AVM Navigator for space orientation: Simple video tutorial "Route training and navigation by map": AVM Navigator v0.7.3 is released. Changes: - The new "Back to checkpoint" algorithm was added in "Navigation by map" mode. First in video the robot has received command: "go to the checkpoint" and when robot arrived to the checkpoint then I brought robot back (several times) in different position of learned route. When robot noticed the changes then it indicated that robot was displaced because any commands were not given by robot to his motors however changes were seen in the input image. Then robot started looking around and localized his current position. Further the robot just calculated path from current position to the checkpoint and went there (and so forth). - Also new "Watching mode" was developed. And robot can move to direction where motion was noticed in this mode. Also common usability was improved. By the way I received new video from user that succeed in "Navigation by map": His robot video and photo: I believe that you also will have success with visual navigation by AVM Navigator module ;-) >>><<< Yet another video from user whose robot has extremely high turn speed but AVM Navigator module could control robot navigation even in this bad condition! His robot video: >>><<< I just assembled my new rover for AVM Navigator project and I plan to improve motion control algorithm that will provide less jerks and stops in robot motion process when robot go to target position. I have two pretty videos regarding visual navigation. It is enough difficult route that was passed by robot with help AVM Navigator (route training and passing): Autonomous navigation view from outside: |
Implementation of the algorithm AVM for C#
| AVM Ver-0.5 | ||||||
| Download | Ver | Date | Size | Download it! | ||
| AVM_SDK_v0-5.zip - Associative Video memory SDK with comparing of new and previous version (C++, VC6). | v0.5 | 30/03/2009 | 2.8 Mb | Download | ||
|
v0.5.1 | 30/03/2009 | 1.6 Mb | Download | ||